


![CONNECT ART ISSUE 2024 SUBMISSIONS [CLOSED]](http://connect.ajet.net/wp-content/uploads/2024/04/ARTISSUE-INSTA-600x500.png)
This article originally featured in the May 2021 issue of Connect.
Jonathan Combey (Tottori)
So you’ve moved to Japan, and there is so much happening around you! You want to be creative, maybe even join …the legions of J-blogger’s and vloggers, but how? Why not your own podcast!? It’s a great way to be creative, practice speaking, and connect with people online. Who knows how many listeners you might get? Regardless, making a podcast is a wonderful creative outlet.
Understandably, microphones and audio can be super scary to begin with. However, you really don’t need a hundred-dollar Blue Yeti microphone to start making a podcast. This article is going to give you a rundown of everything you need to make your own podcast, from picking a mic and making recording space, to editing your podcast and the software you need for that, through making your podcast available to the public via hosting sites. Sounds scary? It shouldn’t! And if it does, I’m here to help you on every step. I’ve outlined easy access points for beginners and more advanced info for those wanting to add a little polish to their operation.
MICROPHONES:
Entry Level:
Your Phone (really)
So first, we need to look at what you’re going to speak into. That is, of course, a microphone, and yes, your phone does contain a mic. It was once used to talk to people. The recording quality of your phone is very likely going to be the best quality microphone that most people have access to. It beats the innards out of any built-in computer mic or headset microphone.
But Jon, whenever I call my mum or friends, we always sound really bad. No one would want to listen to that!
Well, your phone is doing two things when you’re making a call: one is recording your voice, the other is sending it hundreds, if not thousands, of miles away. If we only make it do the former, it tends to be a bit better quality. (Most phones will have some kind of built-in voice memo app). Another reason why your phone calls can sound so bad is that your dad probably isn’t calling you from a sound booth. We’ll cover how to make your own home sound booth a little later.
Formidable Hobbyist:
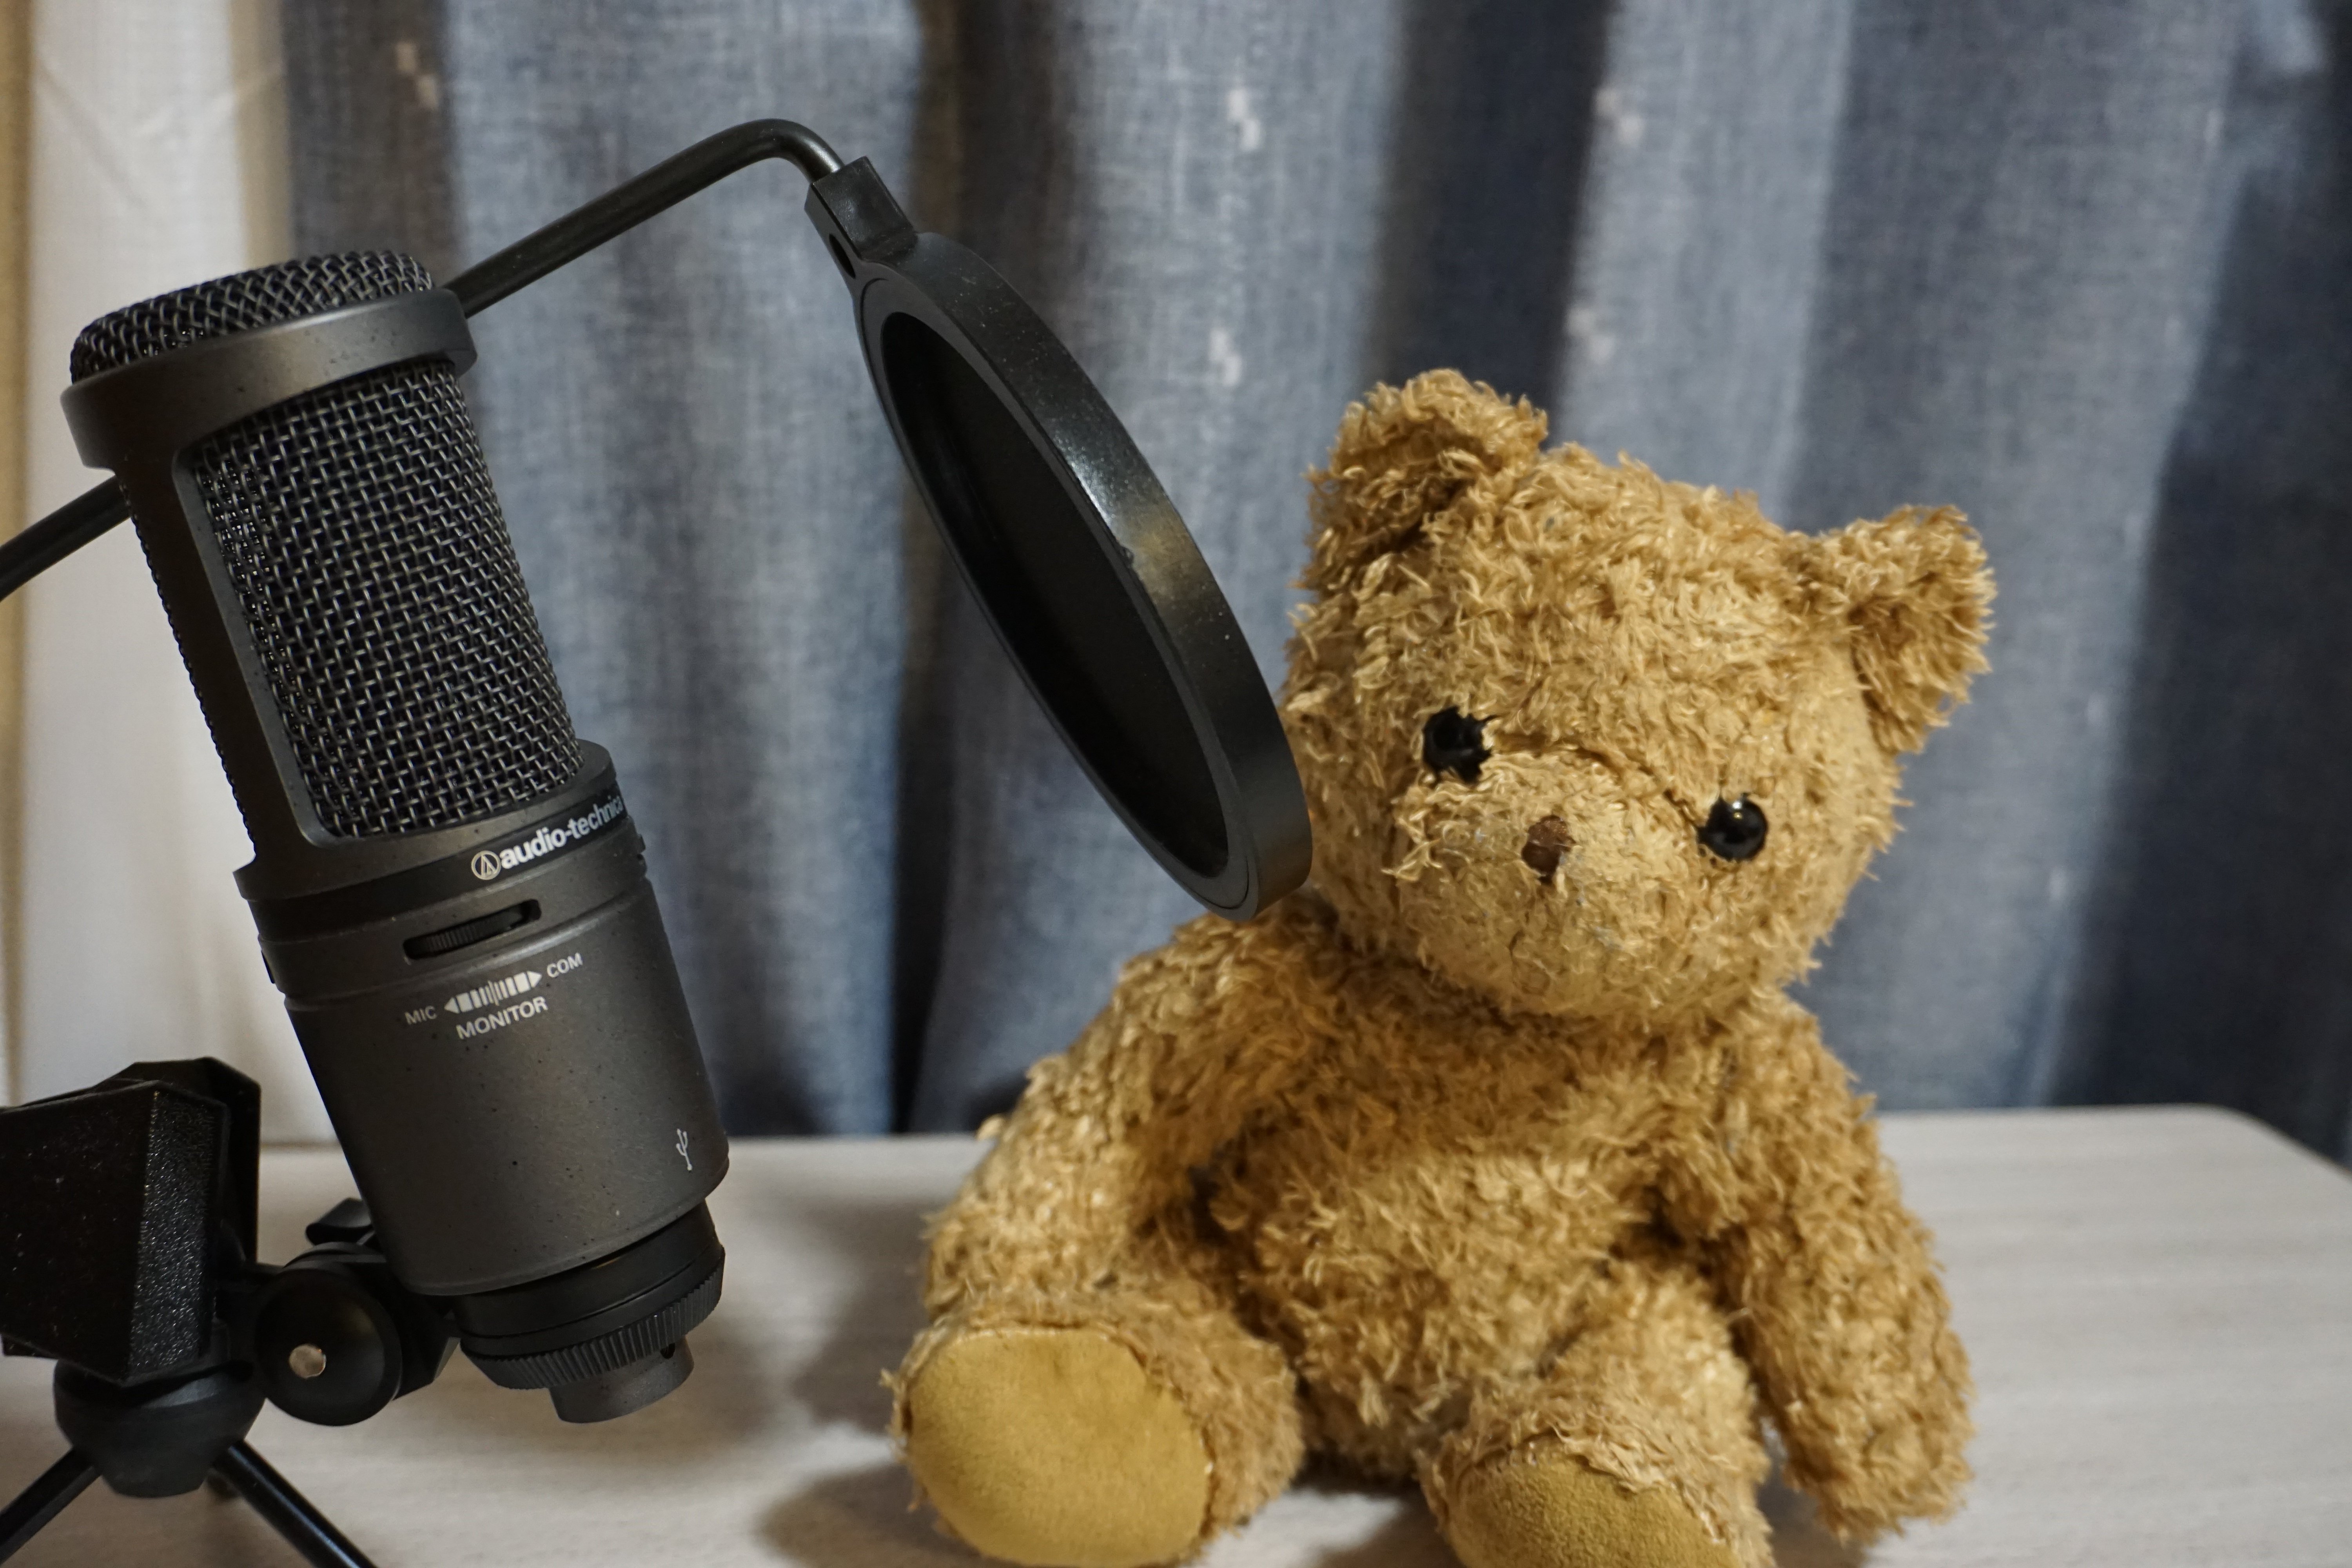
USB Mic + Pop Shield / Mic Cover
If you want to invest in something a little more sophisticated, a decent USB microphone will set you back about 3000-6000 yen. Don’t use a mic attached to a headset or anything overdesigned and branded for something overspecific like “streamers” or “gamers.” They tend to be overpriced and not as good. I recommend the Behringer C1-U USB Condenser Mic. It’s a little more expensive than the rest, but it will last, and if you ever want to upgrade, it will still work fine as a travel mic. What you also need is a pop shield/mic cover. These stop your P’s and B’s from giving an audio flick to the listeners’ ears. Most microphones you buy somewhere like Amazon will have suggested pop shields or covers for your microphone.
Professional Wannabe:
High-Quality USB Condenser Mic / XLR Microphone with Kit
Mics start to get expensive here. There are entire articles dedicated to just this topic, and I recommend you do your own research on what is right for you. The good-level USB and XLR microphones will cost anywhere from 15,000+ yen. XLR uses a different kind of cable that requires extra equipment (usually a mixing board and a power source) but is usually a little better quality. I personally prefer USB because they are easier to use. Regardless, what is most important is that they are condenser microphones. The easiest way I can simplify what that means is they require an external source of electricity to give you better quality. The high-quality USB mics tend to have that all included, but with less quality and less ability to tweak the settings than an XLR microphone.
I personally use an Audio-Technica AT2020 USB+.
RECORDING SPACE:
Entry Level:
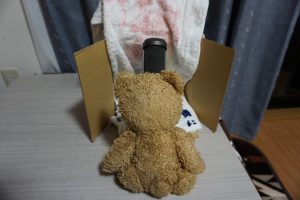
 A Cupboard / Bedsheet
Your recording space is so important! Now pay attention; this is time for the science bit. Sound works in waves. So when you speak, imagine waves coming from your mouth like Banshee from X-Men. What happens when these waves hit hard surfaces like floors, walls, statues of David, is that they bounce off those surfaces, causing reverb and horrible sounds. So what you need to create a DIY sound booth is soft stuff, lots of soft stuff (like clothes and bedding). These soft things absorb the sound waves and stop them bouncing back and messing with your lovely recording. This is why you see that weird, black fabric and foam on sound booths for musicians and voice actors. They make it so your microphone only picks up the best sound waves coming directly from your mouth.
The best way to replicate this at home is simply using a place where you have lots of soft things already, like your closet or wardrobe. Standing amongst your coats and shirts will really improve what your voice sounds like. The most important place to have soft stuff is on the opposite side of the mic from yourself (because you’re already soft, relatively speaking). If you don’t have a semi-walk-in wardrobe, several towels or pieces of bedding strung up between chairs or opposite a sofa will help you considerably. Also, try to have a surface to place your phone on—we move our hands a lot while speaking, and you can hear that!
Formidable Hobbyist:
 Cupboard or Adapted Box
Now, if you’ve made your closet nice and cosy, then there is no reason not to stay there as long as you’re happy with the sound. But another alternative here is getting a cute little cardboard box that will fit your mic. Fill it with some towels or maybe, if you’re super fancy, some of that black sound foam. Now you have a cute little recording box. You can play around with how it sounds, but that box will absorb most of the bad sound, leaving only your beautiful voice. For a more permanent recording box, check the next section.
Professional Wannabe:
Nice Recording Box or Homemade Studio
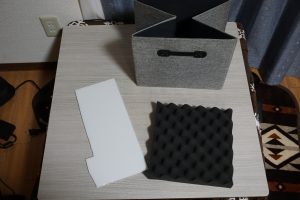
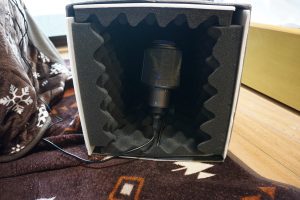
This is what I personally use! What I did was take a collapsible box from Daiso and take some cardboard/art foam, cut them to size, and glue some soundproofing foam to it. Then, I just slotted them in my little box, and boom—a lovely, portable, soundproof mic cover. I just use this on top of my desk, but many people prefer to record standing. All these materials should set you back about 3000ish yen, and you can really hear the difference around your smooth, silky voice. However, in the long term, this space is up to you. By this stage, many people even start making their own home recording studios by covering whole walls with soundproofing foam. Experiment with things that work with your voice and what you are most comfortable with (physically and practically)!
Golden Rule #1 (What not to do!) Do Not Eat the Microphone
Musicians and voice actors might look really cool when they’re close to the mic, but you don’t need to do that! Mics are made to pick up sound, and if you get too close, you might knock the mic or mess up the recording in countless other ways. Each microphone will have different levels of sensitivity, and some have levels you can edit yourself, so finding that perfect distance that sounds best and is comfortable for you is part of the learning experience!
SOFTWARE:
Entry Level:
Free Editing Stuff (GarageBand / Audacity)


Next, editing is a pain! But it’s necessary to transform an hour of talking into a listenable 40 minutes! No one wants to listen to your ums and ers. Or that part where you forgot your notes or have to go to the loo. You don’t have to edit out every er or um, but listening back to yourself is part of the learning experience. (I still don’t like listening to my own voice, and I’ve been doing this for almost six years).
However, what software do you even use to do this editing? Well, for those using Apple devices, GarageBand is mostly for music, but it works just as well for the human instrument. For those on Windows, the best free editing software is something called Audacity. It has everything you need for basic podcasting and is what most amateur editors used when they first started. There are also many handy tutorials like this one.
Formidable Hobbyist:
Audacity (Not broken, don’t fix it).
It’s the perfect kind of software to start learning audio editing, and to be honest, I’ve used it for the past five years without complaint. You can also experiment with some free trials of software you like.
Professional Wannabe:
Adobe Audition / Hindenburg / Logic Pro
Software also gets expensive here. I wouldn’t personally recommend the Adobe Suite. It is the industry standard for a reason, but it also has the price tag to match. It’s also only available as a subscription model, which means you’re going to be shelling out tens of thousands of yen a year. I use an editing software called Hindenburg, which is specialised for voice recording and interviews because that’s what I do! If you’re a podcast that focuses more on travel or highlighting local music, different editing software will suit your needs. This software takes a little longer to learn, as there is just more you can do with it! However, it can raise the sound calibre by doing small things you weren’t even aware of before. This more expensive software also usually comes with an avalanche of quality of life improvements and things to make editing easier, such as clipboards for jingles or automatic sound treatment. (Editing takes a lot of time, so this pays off in the long run!)
Golden Rule #2 (What not to do!)
Copyright is a Thing!
Don’t use other people’s stuff with-out their permission! This sounds simple, but sometimes, it really isn’t. Copy-right is complicated, and fair use is a double-edged sword. I’m not saying you can’t use sound clips to add to your points, but just be prepared for a mess if you didn’t do your homework. Copyright is specifically important for music; radio stations and the like pay loads of fees so they can play different artist’s music—you are not the exception!
HOST:
Entry Level:
YouTube
Now, how do you put your podcast online where people can listen to it? The simplest way to do so is using a platform like YouTube that, while not compatible with iTunes, is a very common place for people to listen to podcasts. All you need is to take your edited podcast and add a single picture or even black screen behind it, upload it to your YouTube account, and—boom! You have just made and uploaded a podcast.
Formidable Hobbyist:
Anchor / BuzzSprout / Podbean / Spreaker

To make your podcast available on iTunes and Spotify, you must first upload it to a Hosting website. Now, there are numerous free (or free to start) hosts such as Anchor and Podbean, but they all function the same way. Once a podcast is uploaded to a hosting website, it gives you a little link called an RSS feed. When you go to iTunes, Spotify, or other services’ pages, it will ask for details about your podcast and your RSS feed, which you now have! It will take a couple of days for the companies to check your content is appropriate, but in the end, you are now with the big boys on the big scene. (They will even automatically update when you upload a new episode to your host—cool isn’t it!?)
Professional Wannabe:
The same hosts from before, but now you pay them!
Finally, in terms of hosting, it’s time to pay up. The big boys for this include Podbean and those listed above. They cost a high subscription fee, but they can be worth it. The one I use is around 15,000 yen a
year, and for that, I have unlimited uploads, and it organises all my statistics for me. I also have it set up so it auto-uploads my podcasts to my Facebook page, YouTube channel, and Twitter. It also automates the approval fun-ctions for applying for places on Spotify, iTunes, and Audible. This is the one step that costs the most, but if you’re certain podcasting is what you want to do, it’s definitely worth it.
These are all the technical skills you should need to set up a podcast. Apart from, you know, the actual talking and doing stuff! Just remember that it’s a fun hobby and, like anything else, you don’t need to be great at it right away. You also don’t need to start with professional tier equipment in order to tell a good story or have a good podcast! Just start with whatever is easy and accessible to you, and have fun with it. Learning is part of the process, and no one starts out perfect, I promise. The only way to get better is to DO IT. The best time to have started was yesterday, and the second-best time to start is today! Happy podcasting!
Pro-tip Thumbnails
I would also really recommend some kind of thumbnail for your podcast. Perhaps an edited version of you and your co-host’s face. Or something related. The visual is ironically quite important when sharing a podcast because people don’t want to listen to something that doesn’t look nice. (It’s weird, but it makes sense if you think about it).
Jon Combey is a podcaster and generally talkative British guy. In his second year in Japan, he hosts Geeks & Gaijins, a podcast focusing on putting local news in Japan under an international (and silly) spotlight. He has been doing radio in some form for almost six years and, when he’s not doing that, he’s playing videogames and discovering obscure facts about history. Let him know your best weird history facts on Twitter @JonCombey.


